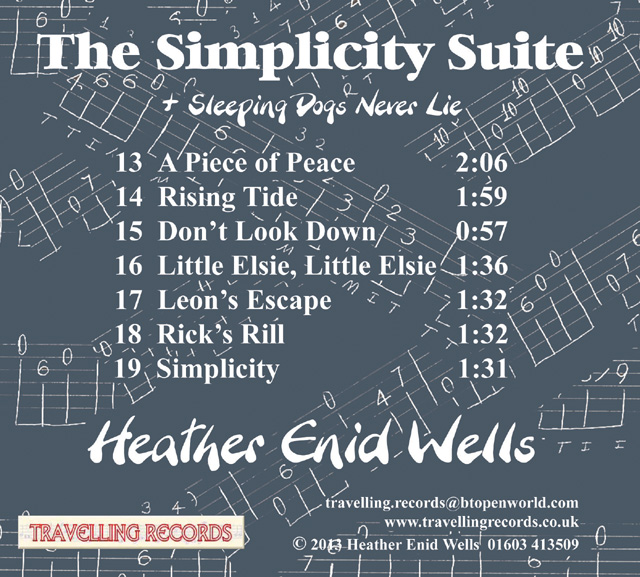
The Simplicity Suite
The Simplicity Suite is a collection of seven short instrumental
pieces in "classical" style, using quite simple guitar techniques.
The idea was to make them easy enough for beginners or near-beginners,
but with the hope that they would be interesting enough to tempt more
practised players.
I have written these out in tab but I'm willing to write out dots/notation
if there are enough requests.
The tabs are jpgs so you can download them by right-clicking on the tab
itself, then you can download them into a folder of your choice on your
computer. Feel free to resize and print them to your taste.
I've included some teaching notes that may be helpful if you want to play
these pieces yourself.
Please click on the red title links to hear and download free demo recordings
of some of these tunes. Or buy my Sleeping Dogs Never Lie album,
which has 19 tracks including the whole of The Simplicity Suite and an eight-page full-colour booklet of pictures and lyrics - good
value at £12 including P+P! On sale at my gigs for £10, or
send me an email and we'll sort something out.
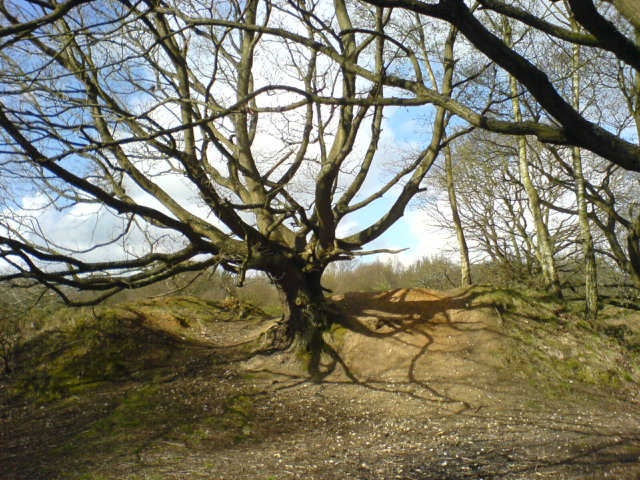
A Piece of Peace
A Piece of Peace has a wistful feel. My picture
is of the Peace Tree.
Introduction to Tab
Here's a quick explanation of tab and how to read it. The six lines represent
the six strings, with the highest-sounding string at the top. Each note
is written on the appropriate string, and appears in the form of a number
representing the fret at which that note is played. The notes are read
from left to right, so if you come across two or more stacked vertically,
play them together.
Guidance as to which finger to use is given for the fretting hand (numbered
1-4) above the set of lines, and for the plucking hand, below them (lettered
T=thumb, I=index, M=middle and R=ring). I've drawn a couple of 'artistic'
diagrams ... you'll have to reverse these if you play left-handed.
So the first note in A Piece of Peace appears as "0"
on string 5 (strings are numbered from the highest-sounding by convention).
The zero means that string 5 is open. So the first note is played by striking
string 5 with your thumb, and the second note, also struck with your thumb,
is string 4 held down at fret 7 by finger 3.
Timing: one tail means a note lasts for one beat, two tails means it lasts
for two beats. Two notes with their tails joined make up one beat, so
the second note will come halfway between the main beats. Some of these
pieces have four main beats to a bar, some have three, Simplicity has two, and Rick's Rill also has two, but with a bumpty-bumpty
feel (technically this is in six-eight timing and for that I haven't written
it correctly, but never mind!)
The other vertical lines over all six strings are bar-lines, they just
signify where each main beat comes, just after each bar-line. Don't leave
any extra time between the notes here - the beats, and therefore the notes,
just continue relentlessly, like a clock ticking. Double bar-lines indicate
the beginnings and ends of sections, e.g. verses.
Navigation: Play A Piece of Peace from the top to the end, where
you will see "D.$. al fine". This is Italian (the language of
music) for "dal segno al fine", meaning play from the sign .$.
to the finish, marked "fine". So, once you've played all through,
you go back to the beginning of the third line of tab, and play to the
end of the fourth line.
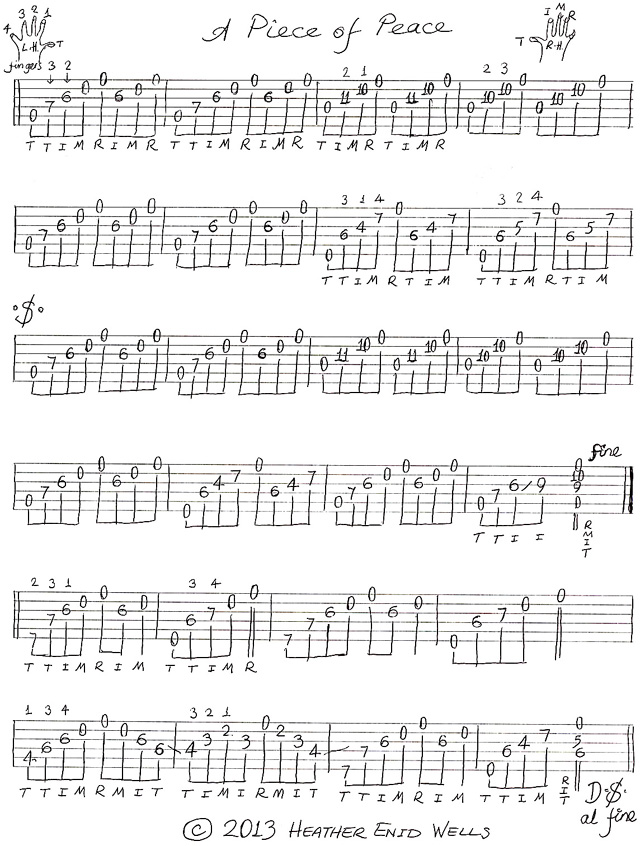
This expressive piece is dedicated to my dear friend Sandy Allen who died
15th April 2009.
The recording is played on a cheap nylon-strung guitar that a milkman
friend of mine found in a dustbin when on his round. The last verse is
not so easy to play (and doesn't appear on the tab), but the piece works
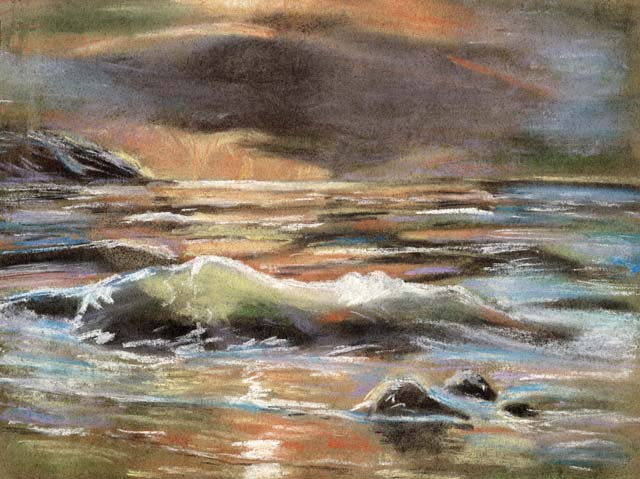
nearly as well without it. The beautiful picture is by pastels artist
George Ing.
Strangely for an instrumental, it does have lyrics. They aren't on the
recording, but you could always sing or recite them yourself, if you like
them, or just read them as you listen to the track.
spirit within
surface of skin,
held in that cage,
turning each page,
reading each line,
serving its time,
waits for the rising tide
forward, retreat,
keeping its beat,
spirit still sleeps.
ocean of deeps
pulled by the moon,
midnight to noon,
lifts with the rising tide
so long the spirit has been
grounded in body's soil.
now turns the flood of green
ending the body's toil.
spirit unbound
seeking new ground
floats on the rising tide
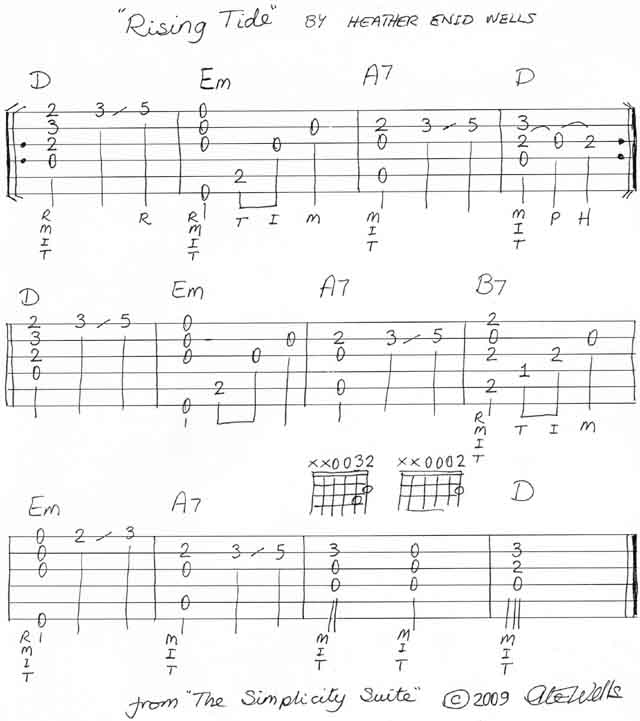
Rising Tide uses standard chord shapes, with mostly
just one finger at a time moved to make the melody come out. The additional
notes, mostly from fret 3 to fret 5, are just little slides
with finger 4 in between the chord changes. The P and H at the end
of the first line are a Pull-off and Hammer-on. That means you don't play
those notes with your normal plucking hand, but finger 2 of your
fretting hand lifts off the string, giving it a little pluck as it goes,
then lands back on the same string at fret 2 with just enough force that
the string sounds again. Keep that in the same rhythm as the rest. I've
put a couple of chord gates near the end, you can see it's just D with
one finger lifted, then D with two fingers lifted, then ends back on a
full D, although you don't pluck string 1 so it doesn't matter whether
you put finger 3 on or not.
Timing: one tail means a note lasts for one beat, two tails means it lasts
for two beats. Two notes with their tails joined make up one beat, so
the second note will come halfway between the beats.
Navigation: repeat all between the colon signs, i.e. the top line is played
twice, and the rest once. That makes up verse 1. Verse 2 is
the same. Verse 3 is not given here as it is a lot harder to play
so doesn't really qualify for the "Simplicity" award. For more
advanced players, the chords are F#m7, Bm, F#m7, Bm, E, A, E, A7. Listen
to the recording and you'll find it!
_________________________________________________________
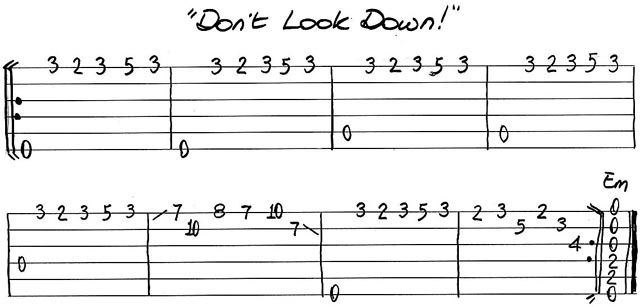
A short, playful piece with a repeated melody over a succession of different
basses.
This piece encourages position playing, one-finger-one-fret,
for the fretting hand, and alternating fingers for the plucking hand.
Most of the time fretting-finger 1 is on fret 2 then, with a
little stretch, finger 4 is on fret 5 (hint: put your thumb
in the centre of the back of the neck, more or less behind fret 3).
When you get to the sixth bar, where we are going up into 'dusty territory',
pluck string 1 and slide finger 1 up it smoothly and steadily
to fret 7, and now finger 4 should fall quite naturally on fret 10.
At the end of that bar, as soon as you've played the last note on fret 7,
slide finger 1 back down string 2 so you arrive back at your
original position. As the title says - don't look down! A little
practice and you'll be hitting it accurately and confidently every time.
It helps if you think of the little finger being on fret 5, the whole
hand jumping over the empty fret 6, and landing with finger 1
on fret 7, and the reverse on the way back down.
For the plucking hand I suggest, once you've played the bass note with
your thumb, play the others in order: Ring, Middle, Index, Ring, Middle,
and similarly for those two bars with no bass note, R M I R M I.
Then a nice relaxed strum across all strings on the Em at the end.
I haven't put any timing but it is just regular throughout, although it
is nice to vary the speed a little as I have done on the recording.
_________________________________________________________
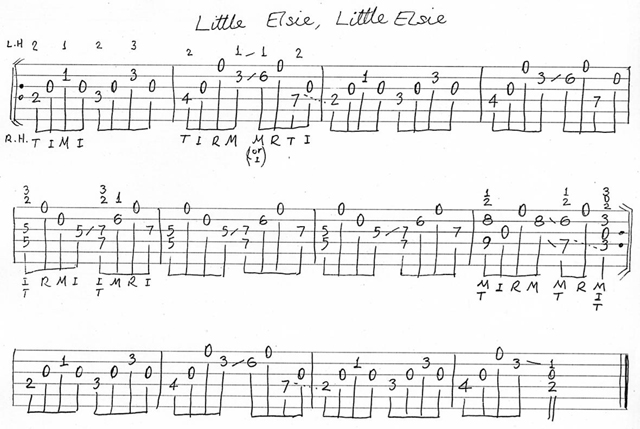
Little Elsie, Little Elsie
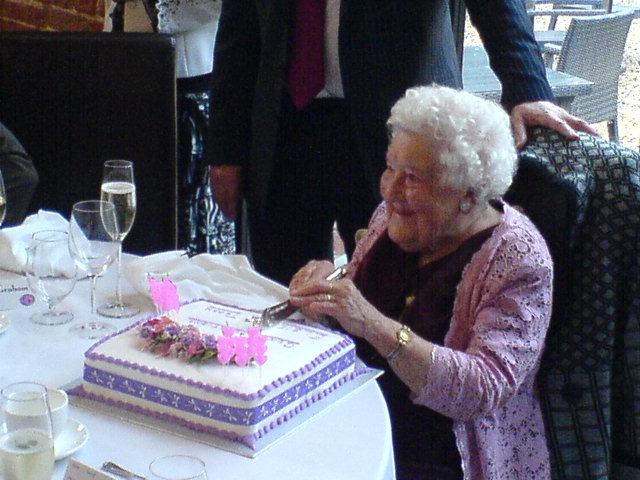
Little Elsie was my friend and neighbour for many years,
and sadly died recently aged 102. I miss her a lot, she was a lovely lady,
very kind and with a great sense of humour! This picture shows Elsie cutting
her cake at her 100th birthday party.
They don't come much easier than this piece... for a start, it's played
on only four strings! And, if you know the standard C or Am chord, you're
away, because this piece consists mainly of sliding fingers 1 and 2 from
that shape, with a couple of variations, up and down the neck. Sometimes
the full Am shape appears, sometimes the Am shape without finger 1, and
sometimes an A7 shape. Those four shapes are all you need. There's also
quite a lot of repetition, so there really isn't a lot to learn.
Start with the shape on frets 1 and 2, then go up one fret so finger 2
is at fret 3, and drop finger 3 on to string 2 at the same fret as finger
2. Leave finger 1 on, because you need it again to start the second bar,
where you have gone up one more fret and taken off finger 3. Those two
bars then repeat exactly.
Now take finger 2 up one more fret, from 4 to 5, this time put finger
3 down on the same fret as finger 2 but on string 3. Move up to fret 7
and complete the Am shape there. Repeat that bar twice more. Then the
shape that started the piece moves up so that finger 2 is on fret 9, and
then the same on fret 7, then back to the level shape like the second
half of bar 1.
Navigation: repeat all between the double dots, after which it's the same
as the first line again except that the second half of the fourth bar
just changes back to the starting place of the whole piece, for a nice
classy little ending.
_________________________________________________________
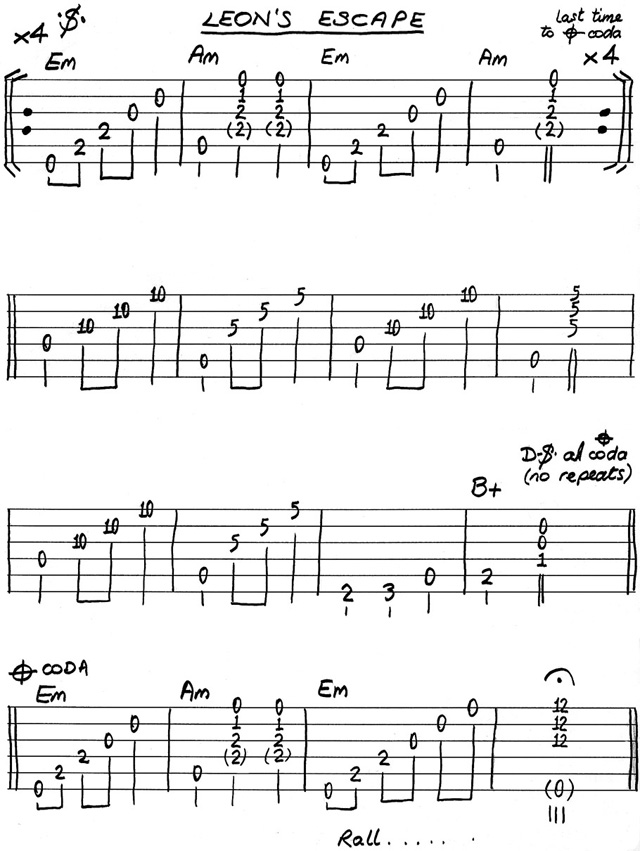
Leon's Escape
A menacing mood, but Leon does take flight at the end!
This piece is probably even easier than Little Elsie, Little Elsie,
and can be played fingerstyle or even with a plectrum. Mostly you have
standard chord-shapes for the fretting hand.
Play the first line four times. Then at the beginning of the second line,
lay the pad of finger 1 straight across strings 1, 2 and 3 at fret 10,
and in the next bar similarly, at fret 5. You can make the sound
of the slide between the two positions come out, or not, as you prefer,
by either keeping the finger pressed down or releasing its grip before
it moves. Continue into the third line, when you get to the third bar
of that line you will have to read the single-note bass run from the tab.
The B+ chord is just fingers 1 and 2, it's only one finger different
from Em if you normally play your Em with fingers 2 and 3, since
finger 2 is in the same place. Make sure you hit only the notes in
the tab as the others will clash horribly here! From there you go back
to the top, play the first line just once, and then the last line to finish
the piece.
_________________________________________________________
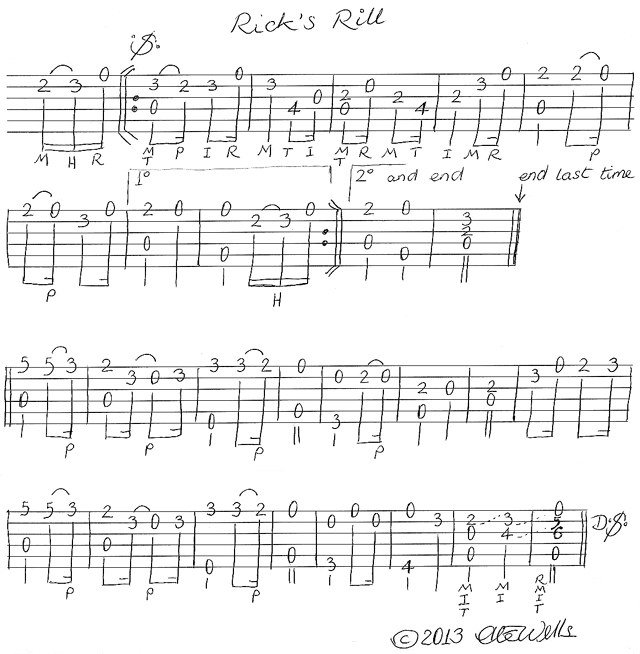
Rick's Rill
That's Rick in the picture, the late Rick
Hayward, wonderful player and all-round gorgeous guy! I wrote this
piece as a tribute to him. Rick loved the countryside and the wild places,
and the piece was the nearest I could get to expressing a little stream
with dancing water splashing over stones.
Rick's Rill is a jig but a fairly stately one! It has quite a nice
lilt to it and doesn't need to be played too fast. The plucking hand is
the trickiest and after trying it several ways I found the fingering I've
suggested (despite feeling a bit alien if you are used to the usual one-finger-one-string
system) works best once you get the piece up to speed. It's the third
bar that causes the trouble! Well, I don't think you'll have trouble if
you learn it like this from the start. If you learned it another way,
and that way didn't work, you'd only have to unlearn it...
The fretting hand is extremely easy. For all but the sliding-up in the
two bars before the D.$., keep one finger to each fret, starting with
finger 1 on fret 2, so that fret 5 will be played with finger 4. The sliding-up
bit is just fingers 1 and 2. There are a lot of pull-offs and the odd
hammer-on - for details of those techniques, please see Rising
Tide, above.
If you want to play along with the recording, you'll need your capo on
the 3rd fret.
_________________________________________________________
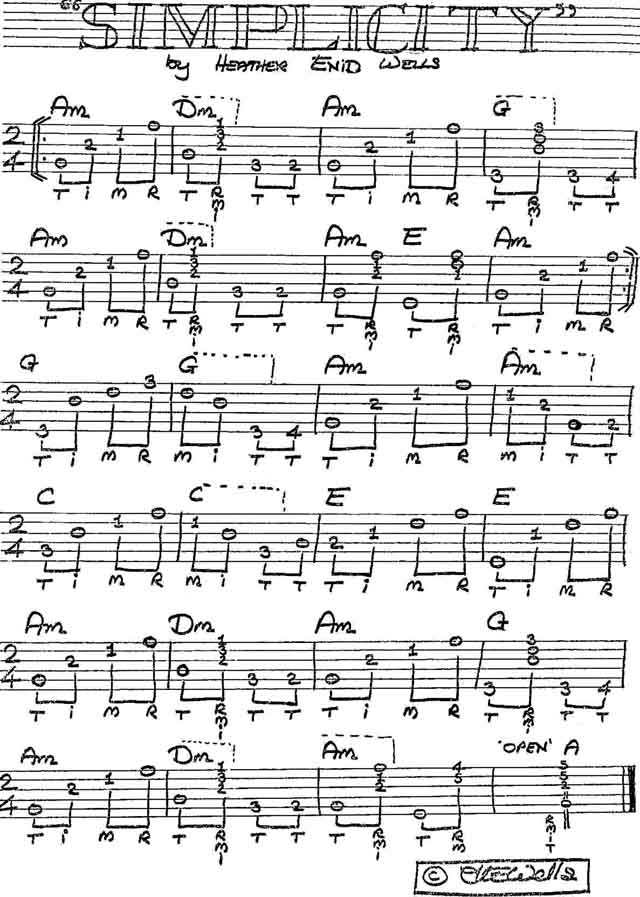
I like to give them encouraging titles!
Simplicity not difficult to play, but keeping
it smooth and flowing takes a little practice. It's not meant to be fast,
it should sound dignified and rolling, never rushed. To play along with
the recording, put your capo on the 4th fret.
Mostly the fretting hand plays standard chord-shapes, interspersed with
little single-note bass runs. The dotted lines show where you can release
at least some of the chord in order to free up a finger or two to play
these runs. Play the first two lines twice.
The ending is quite tricky, but it needs to slow here ("rall")
considerably and ease to a halt at the end, which helps! The last-but-one
chord is easier to grab if you think of it as a D-shape moved up two frets.
The very last chord, "Open" A, which I suppose nowadays would
be called A5, is a stretch like in Don't Look Down. Put fretting-finger 1
across the first four strings at fret 2, though really you only need
to put any pressure on the middle two strings. Now stretch out finger 4
and lay it across the first two strings at fret 5. Keep the roots
of your fingers near the edge of the neck and your thumb in the middle
of it at the back. The fingers should bend forwards to a right-angle at
their middle joint (the one you knock doors with!), not where they join
the palm - keep the palm as open as you can, not cupped inward. There,
not as hard as you thought, was it? Enjoy!
_________________________________________________________
My first album was entitled Different
Windows, and you can click on that title for a page of tabs,
track notes, lyrics and links to recordings, as the CD is sold out.
My second, Sleeping Dogs Never Lie,
released in Summer 2013, has ten songs and two instrumentals as the main
album, and also includes the whole of the Simplicity Suite.
Demo versions of a few of these and some additional tracks can be heard
via this SoundClick
music page and tabs and links for them should appear here on Travelling
Records in due course.
If you are having difficulty printing off these tabs, please email and they'll be sent to you free of charge.
I am happy for my songs and instrumentals to be performed by anyone, anywhere,
in any style, with two provisos:
1. that an honest attempt is made to represent the spirit of the song
fairly; and
2. that I am credited by name for it, for example, "This is a song
by Heather Enid Wells".
All constructive comments on the tab are welcome. I have also put up some tabs for my own arrangements of some well known songs and instrumentals on a Secret Tabs page... yes, that link should take you there... Ssshh!